IS ANYONE UP FOR A CHALLENGE?
My friend Donna has inspired me. See her blog for instructions on a tie quilt. Yesterday I got out all the colored jeans I have been saving to make a jean quilt. I thought I'd share:
Supplies: Jeans, quilt batting (flat), heavy duty sewing machine needle (size 16 does fine), heavy duty thread.
First you collect old jeans. I wanted to make a colorful quilt so I visited my local Goodwill store and picked some out. You'll need to cut out a lot of squares. I make mine 7.5"x7.5". You could make them smaller if prefered. The butt pockets are the cutest. Figure out how many pockets you have to work with and then sit down and fiqure out your design. It also helps to know the size of quilt you want. (divide measurements by 7" to know how many squares you'll need).
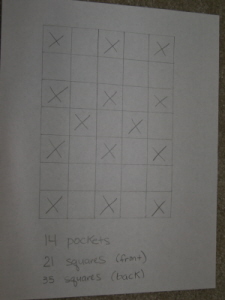
I had 14 pockets to use, so I made my design from there. Hint: You'll need squares to cover the back also.
This blanket is a crib size. I used 35 squares for the back and for the front I used 14 pockets and 21 squares.
After you have cut your squares, cut smaller squares of quilt batting. Next you'll sew your squares together.
Hint: If you decide to make a colorful quilt instead of straight jeans, I highly suggest laying out your design and write it down so you won't have a bunch of the same color together.
Sew a front piece to a back piece with batting in the middle, WRONG SIDES TOGETHER.
Plain squares get an x. Pockets get sewn around inside of pocket, leaving opening for functional pocket.

After your squares are sewn together, the next step is to sew square to square with back pieces together. This leaves the seam in the front. Do this step to create rows following your pattern. After the rows are sewn across, it is time to sew them together. (This is where you need to kiss your machine and tell it you love it and what a fine machine it is, because it may end up hating you :)
Hint: It is important to always sew back pieces facing each other so all the seams are in the front.
I am having a problem posting anymore pictures, so I will continue with the instructions and try to post the pics in another post.
After you have sewn your squares into rows and your rows into a blanket, your last step is to sew a border around the perimeter of the blanket to hold it all together. Your front should have all of your seam allowances in squares sticking out, with the back neatly sewn in.
Now throw it in the washing machine and dryer, twice. It will come out all fread. Trim the fread thread off and you are finished!
Supplies: Jeans, quilt batting (flat), heavy duty sewing machine needle (size 16 does fine), heavy duty thread.
First you collect old jeans. I wanted to make a colorful quilt so I visited my local Goodwill store and picked some out. You'll need to cut out a lot of squares. I make mine 7.5"x7.5". You could make them smaller if prefered. The butt pockets are the cutest. Figure out how many pockets you have to work with and then sit down and fiqure out your design. It also helps to know the size of quilt you want. (divide measurements by 7" to know how many squares you'll need).

I had 14 pockets to use, so I made my design from there. Hint: You'll need squares to cover the back also.
This blanket is a crib size. I used 35 squares for the back and for the front I used 14 pockets and 21 squares.
After you have cut your squares, cut smaller squares of quilt batting. Next you'll sew your squares together.
Hint: If you decide to make a colorful quilt instead of straight jeans, I highly suggest laying out your design and write it down so you won't have a bunch of the same color together.

Sew a front piece to a back piece with batting in the middle, WRONG SIDES TOGETHER.
Plain squares get an x. Pockets get sewn around inside of pocket, leaving opening for functional pocket.

After your squares are sewn together, the next step is to sew square to square with back pieces together. This leaves the seam in the front. Do this step to create rows following your pattern. After the rows are sewn across, it is time to sew them together. (This is where you need to kiss your machine and tell it you love it and what a fine machine it is, because it may end up hating you :)
Hint: It is important to always sew back pieces facing each other so all the seams are in the front.
I am having a problem posting anymore pictures, so I will continue with the instructions and try to post the pics in another post.
After you have sewn your squares into rows and your rows into a blanket, your last step is to sew a border around the perimeter of the blanket to hold it all together. Your front should have all of your seam allowances in squares sticking out, with the back neatly sewn in.
Now throw it in the washing machine and dryer, twice. It will come out all fread. Trim the fread thread off and you are finished!


0 Comments:
Post a Comment
<< Home